When it comes to DIY flooring installation, homeowners often dive into the project with enthusiasm, but without the necessary preparation and knowledge, they may encounter common mistakes that can lead to disappointing results. To achieve successful flooring projects, it is essential to understand the importance of proper preparation and the potential pitfalls to avoid. This article aims to provide readers with valuable tips and insights to help them steer clear of common mistakes in DIY flooring installation. By learning from these experiences, homeowners can save time, money, and frustration while achieving beautiful and durable flooring in their homes.
Understanding the Project Scope and Limitations
Before embarking on a DIY flooring installation, it is crucial to assess the project scope and understand your personal limitations. While DIY projects can be rewarding, it’s important to be realistic about your skills, knowledge, and available resources. Consider the complexity of the project, the level of expertise required, and the time and effort involved. If you lack experience or the project is beyond your capabilities, it may be wise to seek professional help.
By seeking professional assistance for complex projects, you can ensure that the job is done right the first time, saving you from potential mistakes and costly repairs down the line. Professionals have the expertise, tools, and resources to handle intricate installations and address any unforeseen challenges that may arise. Additionally, they can provide valuable guidance and advice throughout the process, ensuring a smooth and successful flooring installation.
Remember, it’s better to seek professional help and achieve a flawless result than to risk a subpar outcome due to a lack of experience or inadequate resources.
Choosing the Right Flooring Material
One of the critical aspects of a successful DIY flooring installation is selecting the appropriate flooring material for your project. Each type of flooring material has its own unique characteristics, advantages, and maintenance requirements. Consider factors such as durability, moisture resistance, ease of installation, and suitability for the intended space.
Research popular flooring materials such as hardwood, laminate, vinyl, tile, and carpet to understand their pros and cons. Hardwood offers timeless beauty and durability but requires regular maintenance. Laminate provides a cost-effective alternative with versatility in design. Vinyl is known for its water resistance and easy maintenance. Tile offers durability and a wide range of design options. Carpet provides comfort and insulation but requires more upkeep.
By understanding the attributes and considerations of each flooring material, you can make an informed decision that aligns with your project goals, budget, and lifestyle.
Proper Planning and Preparation
Proper planning and preparation are crucial for a smooth DIY flooring installation. Before diving into the project, take the time to plan and prepare accordingly. Start by measuring the space accurately to determine the amount of flooring material needed. Remember to account for any necessary wastage or extra planks/tiles.
Additionally, ensure that the flooring material has ample time to acclimate to the environment. Follow the manufacturer’s guidelines for acclimation duration and storage conditions. This step helps prevent issues such as warping or buckling after installation.
Next, prepare the subfloor by ensuring it is clean, level, and free from any moisture or debris. A smooth and even subfloor is essential for a seamless and durable flooring installation. Address any necessary repairs or adjustments to create a stable foundation for the new flooring.
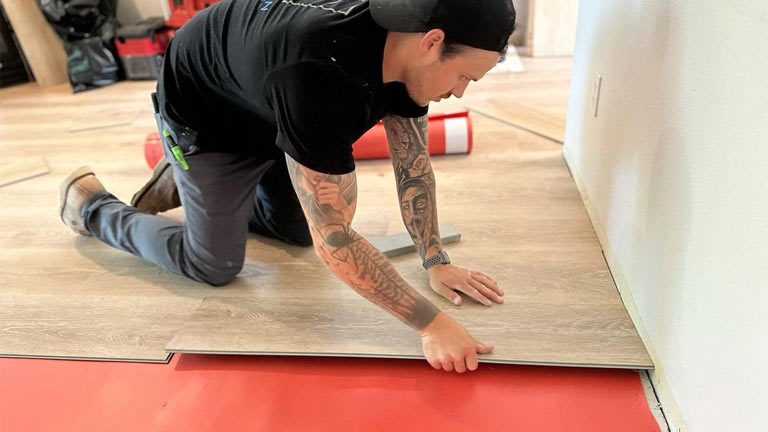
Gather all the necessary tools and equipment before starting the installation process. This may include items such as a tape measure, spacers, underlayment, adhesive, and a power saw, depending on the type of flooring material chosen. Familiarize yourself with the manufacturer’s instructions and recommendations for installation to ensure proper techniques and best practices.
Create a detailed installation plan that outlines the sequence of steps and the specific requirements for your chosen flooring material. This plan will help you stay organized and minimize mistakes or oversights during the installation process.
By investing time and effort in proper planning and preparation, you can set yourself up for a more efficient and successful DIY flooring installation.
Understanding and Following Installation Guidelines
To ensure a successful DIY flooring installation, it is crucial to carefully read and understand the installation guidelines provided by the flooring manufacturer. These guidelines are specifically designed to ensure optimal performance and longevity of the flooring material.
Pay close attention to instructions regarding subfloor preparation, adhesive application, and proper installation techniques. Improper subfloor preparation or incorrect adhesive application can lead to issues such as uneven surfaces, gaps, or delamination. Following the manufacturer’s guidelines will help you achieve a durable and visually appealing result.
Avoid taking shortcuts or skipping any steps in the installation process. While it may be tempting to rush through the project, each step serves a purpose in achieving a high-quality installation. Take the time to do each step correctly, whether it is applying adhesive, aligning the planks or tiles, or ensuring proper spacing. This attention to detail will greatly enhance the final outcome of your DIY flooring project.
Handling and Cutting Flooring Materials
One area where common mistakes can occur during DIY flooring installation is in the handling and cutting of flooring materials. Proper handling and cutting techniques are essential to ensure accurate measurements and clean edges.
When handling flooring materials, be mindful of their fragility and vulnerability to damage. Avoid dropping or mishandling the planks, tiles, or rolls. Store the materials in a clean and dry area to prevent moisture or debris from affecting their quality.
Use appropriate tools for cutting, such as a sharp utility knife, a power saw, or a tile cutter, depending on the type of flooring material you are working with. Ensure that the tools are in good condition and properly calibrated for precise cuts.
Accurate measurements are crucial for a seamless installation. Take the time to measure and mark the flooring materials accurately, allowing for any necessary adjustments and ensuring a proper fit within the space. Double-check your measurements before making any cuts to avoid costly mistakes.
Precision is key when cutting flooring materials. Use a straight edge or a guide to ensure straight and clean cuts. Take your time and make deliberate, controlled cuts to achieve professional-looking results.
By following proper handling and cutting techniques, you can minimize waste, achieve accurate fits, and create a polished finish in your DIY flooring installation.
Paying Attention to Detail
Throughout the DIY flooring installation process, paying attention to detail is essential to achieve a professional-looking result. Common mistakes such as improper spacing, misalignment, or failure to address obstacles and transitions can significantly impact the overall appearance and functionality of the flooring.
Double-check your measurements and ensure they are accurate before proceeding with the installation. This will help avoid issues such as gaps or uneven seams. Use spacers to maintain consistent spacing between planks or tiles, ensuring a uniform and visually appealing layout.
Take the time to address obstacles and transitions properly. This includes carefully cutting the flooring material to fit around doorways, cabinets, or other structures. Use appropriate transition pieces to create a seamless flow between different flooring areas.
Maintaining consistent spacing and alignment is crucial for a polished look. Regularly check and adjust the position of the flooring as you progress to avoid any gradual misalignment. Address any issues promptly to avoid having to make significant adjustments later.
Finishing and Clean-Up
Properly finishing the flooring installation is essential to ensure a visually pleasing and functional result. Secure trim pieces, such as baseboards or quarter-round moldings, to create a clean and polished appearance. Pay attention to details like ensuring tight fits and smooth transitions.
After completing the installation, conduct a thorough clean-up. Remove any excess adhesive or debris from the flooring surface to prevent it from affecting the appearance or integrity of the flooring. Follow manufacturer recommendations for cleaning and maintenance to keep your new flooring in top condition.
A clean and tidy final result will enhance the overall look and satisfaction of your DIY flooring project. Take the time to complete the finishing touches and conduct a meticulous clean-up to achieve a professional-grade finish.
Final Words
Avoiding common mistakes in DIY flooring installation is crucial to achieving a successful outcome. Thorough planning, proper preparation, attention to detail, and following manufacturer guidelines are key to a smooth and visually appealing installation.
By realistically assessing your skills and limitations, selecting the right flooring material, and investing time in preparation, you can set yourself up for a successful DIY flooring project. Paying attention to detail throughout the installation process, including accurate measurements, proper spacing, and alignment, will help you achieve a professional finish.
Remember, seeking professional assistance when needed is always a wise decision. Flooring professionals have the expertise and experience to tackle complex projects or address challenging situations. Don’t hesitate to reach out to them for guidance or assistance.
By following these tips and avoiding common mistakes, you can enjoy the satisfaction of a beautifully installed floor that enhances the comfort and aesthetics of your space.
Popular Questions
What are the common mistakes to avoid in DIY flooring installation?
Common mistakes to avoid in DIY flooring installation include inadequate preparation, improper handling and cutting of materials, failure to follow installation guidelines, lack of attention to detail, and insufficient finishing and clean-up.
How can I ensure accurate measurements for my DIY flooring project?
To ensure accurate measurements, use precise measuring tools, double-check your measurements before cutting or installing, and account for any necessary spacing or expansion gaps as recommended by the manufacturer. Take the time to measure each area carefully to avoid costly mistakes.
What should I do if I encounter obstacles or transitions during the flooring installation?
When encountering obstacles or transitions, carefully measure and cut the flooring material to fit around them. Use appropriate tools, such as a jigsaw or miter saw, to achieve clean and precise cuts. Additionally, ensure smooth transitions by using suitable transition pieces that match the flooring material.
How important is attention to detail during the DIY flooring installation process?
Attention to detail is crucial for a successful DIY flooring installation. It includes maintaining consistent spacing and alignment, checking for levelness, ensuring proper adhesion and seamless transitions, and addressing any issues promptly. Paying attention to detail will result in a professional-looking and long-lasting floor.
Is finishing and clean-up an important part of DIY flooring installation?
Yes, proper finishing and clean-up are essential to achieve a polished and professional result. Secure trim pieces accurately, remove excess adhesive or debris, and conduct a thorough cleaning of the flooring surface. A clean and tidy final result adds to the overall satisfaction and longevity of your DIY flooring project.


