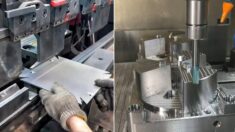
Sheet metal is a great tool for many jobs because it’s so simple to use. With just a few tools, you can accomplish a lot.
It can still be quite easy to get lost if you don’t know the right techniques.
These tips will help you create professional-looking, accurate bends when working with sheet metal. You can choose from the wide variety of tools that they have.
Find out which materials are best for bending.
Certain materials are more malleable than others. This means that certain materials will bend while others will crack and weaken. To reduce cracking in less malleable materials, it may be possible to heat the workpiece.
These are common materials you may encounter in sheet form. We also have information about how easy it is to bend them without cracking.
Do not bend to an internal corner that is sharp.
You’ll add a lot of internal stress to your sheet metal if you bend towards an inside corner. You can crack or weaken metal even with malleable materials.
You can create a radius around the tool you use to bend the metal. This will prevent cracking and weak spots.
This is a good rule of thumb for most materials.
The inside radius of your bend should equal the thickness of the material you are forming.
To put it another way, if you are bending a 1/8″ sheet, use a tool that has a 1/8″ radius to make the inside bend. Use a radius of 0.020 inches if you are bending material that is 0.020 inches thick.
But: In most cases with aluminum or stainless steel, you can use a zero radius bend for anything less than 0.050 inches thick. It won’t be at its maximum strength.
Here’s how to get the maximum strength through bends. This chart is for aluminum and stainless. It’s currently being used by the aerospace industry in their flying tin cans
This is the maximum strength limit. You can certainly go lower than this, but it won’t be nearly as strong. You can also see what the heat treatment condition and the grade of the metal affect what you are able to do with it.
Make use of a Bend Allowance.
You will need to allow for bend allowance if you are going to do semi-precision work that requires the flange length to be accurate or between bends to be somewhat accurate.
This is less important if you are only doing one bend and will be trimming anyway. This should be calculated.
Calculating bend allowance is a good way to get more accurate numbers when you lay out a flat sheet of metal because it can be pulled, pulled, and stretched.
There are several factors that can influence this: the thickness of the material, internal radius size, etc.
The thickness of sheets (decimal inches). Inside Bend Radius (decimal inches) Bend Angle (degrees) K-Factor (For more malleable materials, this is usually about 0.33 and harder materials are about 0.50) Bend Allowance Outside Setback.
Here’s how to interpret this information:
The Bend Allowance is a payment for the material’s damage when it’s stretched from a flat pattern to a bend. This value can be used to calculate how many flanges you will have after you bend the material.
Here’s another diagram to show you how the same part would look like a flat pattern.
Knowing how much material the bend will consume allows us to determine the best location.
If you need extremely precise calculations, keep in mind that there are many variables that can affect the accuracy of this calculation. The K factor of the bend will be affected by the exact hardness or temper of the metal. This will have an impact on how much material is needed to reach the desired lengths.
This is a great way for precise bends.
Use heat for thick/heavy bends.
You can do a few things with heat. Two of the most important are hot forming and annealing.
This is useful for materials that can’t be bent without cracking or severe force.
Annealing
Annealing is a method of making the metal more malleable. This is most often used for carbon steel but can also be useful (albeit a little trickier) for certain types of aluminum.
Steel
This is possible for carbon steels if the metal has enough carbon to be heat-treatable.
Steel is the best material for this. Heat it up until it turns a nice cherry color, then cool it down as slowly as you can. This is usually 70 F/hour for most steels.
It can be difficult with small pieces. Here’s how to do it:
Make sure you have a lot of sand. Use something like playground sand and cook it for a while until it is dry.
Make a larger block of steel, heat it to a bright cherry red color, and then place it in the sand. This will allow the sand to warm up.
Heat up the smaller piece and then place it next to the larger piece of metal. The smaller piece will not cool as quickly if there is enough warmth between them. You’ll get a nice, annealed piece of steel after letting it rest for a while (or even overnight).
If you have a heat treatment oven or a fire kiln, the farmyard approach is unnecessary. Let it cool in the cooker while keeping the door shut.
Aluminum
This works only for heat-treatable grades 6061 and 7075. This can be a difficult area to anneal. However, I discovered a great trick that worked almost every time.
An oxyfuel torch is required for this process to be successful. You will need to light the torch using acetylene or any other fuel. This will create a black smoke flame. The soot will make the aluminum piece black.
Turn on your oxygen to create a regular flame. However, keep it smaller than normal. If you have a rosebud tip, use it. This is the trick to keep aluminum from melting, but you must get close to that melting temperature to make it work.
Slowly heat the metal, moving the torch slowly back and forth so that the soot is gone. This is how you can tell if the aluminum has reached the correct temperature.
Let it cool down slowly. This can be done by moving the torch farther away or using the hot snuggle technique (I’m pretty sure that’s the technical term…HSM?). Aluminum will become brittle if it cools too quickly or is not cooled down enough.
Aluminum is now malleable and suitable for bending with aluminum pipe benders machines, for example. It’s not easy to heat treat aluminum after it has been worked. It should be heated to 1000 F. After it has sat at that temperature for an hour, water can be used to cool it. It can be aged by heating it to 400 F and soaking it for about an hour. Then let it air-cool.
Hot Bending
It’s not difficult to do. Simply heat it up until it turns red (or ferrous), then bend it. This will cause significant heat damage, so you may need to redo any heat treatment.
This can be a problem for thin, long pieces as it will cool down as soon as the heat source has gone. This can be beneficial if you are working on a small project.
This works well for acrylic and certain plastics.
Protect the Surfaces
Metal can be bent to scratch surfaces. It’s worth spending a little extra time to make sure they’re protected.
This is the easiest way to do it. Simply place masking tape wherever you’re going to come in contact with something difficult.
You can use masking tape to protect the metal from further scratching.
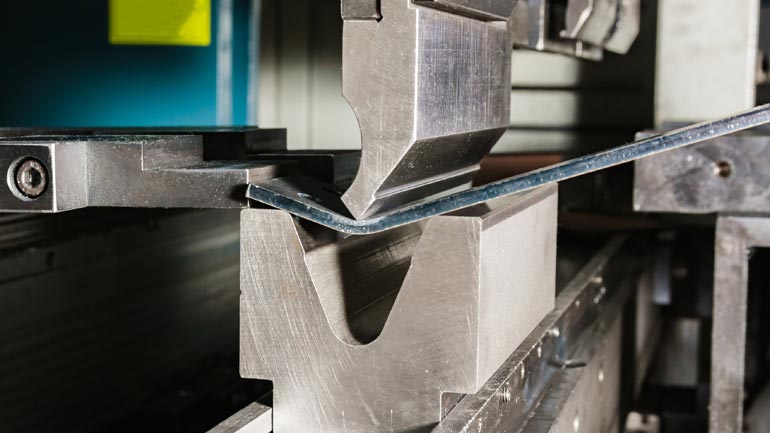
Use a Brake
A brake is the best option for smooth bends. The sheet can be bent in a continuous, clean motion that doesn’t cause any distortions or warping.
Many people don’t own one, but they can be purchased online for a very affordable price (that works well enough for small hobbies). You could also spend a few hundred dollars on a smaller, more elegant one.
You can rent larger tools, such as those needed to work with fascia and soffit on your home, by simply going to a rental shop and picking one up. They are usually available for rent for as little as one week.
Other useful tools
Some things don’t require a brake. There are many other methods to bend sheet metal, particularly if it is a smaller part.
A common way I use sheet metal to make automotive panels is to sandwich 2x4s in a vise with my workpiece in the center and then work the metal using a rubber mallet. This allows you to use 2x4s with a longer reach than you would get from a standard vise. The radius of the 2x4s means that the sheet metal fabrication will be transferred to it, which allows for around fold. Your bends will also be strong.
Sewing pliers are another option (link to Amazon). These pliers are very affordable and can be used for smaller, thinner pieces. A couple of these tools should be in every toolbox. These can be used to make some very nice and clean bends. You can also use masking tape to cover the jaws of your workpiece. This makes it easier to prevent metal scratches.
Plan Your Bends
I used to work in a helicopter repair shop, where I would make formed steel tools measuring anywhere from 4′-12′ long. I once didn’t plan my bends and ended up not being capable of fitting the workpiece into the brake for the last bend. It was really awful.
Plan your route if you are doing a lot of steep bends. You should ensure that the workpiece fits in your tool at all stages.
This is easiest to do by simply cutting a small strip of metal to test the idea. Mark the bends with a number every time. You can reach the end if you are able to do it without difficulty. If not, just continue your steps.
There are some shapes that aren’t practical for most bending tools. Without special tools, it can be difficult to make a U-channel deep enough with a narrow bottom. They can be done by pushing metal into a hard urethane slab using a flat bar from a hydraulic press. I have done this before.
Another option is to cut it into two pieces and then weld them together in your problem area. Each job is unique, so there are no general guidelines. The exhaustive list of principles could be considered a manual.
It is simple to use a test strip. This works almost every time. It is better to make a small offcut than a large sheet of expensive material.